

Agronomic Advice
How Can You Maximize the Performance of Your Post-Harvest Herbicide This Year?
With an earlier harvest this year than in previous years, it is a good time to consider post-harvest herbicide application to manage hard to control winter annual and perennial weeds and clean up your fields for next year.
Here are some tips to help achieve great post-harvest weed control:
Harvest management: Consider cutting stubble high to maximize weed leaf area and to minimize the time it will take for plants to grow to the recommended stage. Also, ensure straw and chaff are spread evenly so that proper coverage is obtained on low-growing and smaller weeds.
Ensure adequate regrowth: After harvest, spraying should be delayed until weeds grow back and develop new leaves. For effective control, any weed that is being sprayed post-harvest should be actively growing and have a minimum of 60% green leaf tissue. Avoid herbicide application if growing conditions are poor due to drought or other stress factors.
Tillage interval: Under good growing conditions, allow a minimum of 3 days after application before tillage for the herbicide to translocate in the plant as much as possible. Under cool and cloudy conditions plant growth may slow down, so it is recommended to allow more time for translocation of the product to the roots of the weed (up to 10 days).
Water volume: Since there is a minimal canopy covering the target weeds, lower water volumes may be used.
Tank mixing for winter annual weed control: Perennial weeds are at low risk to develop glyphosate resistance, therefore applying glyphosate alone at post-harvest can be an economical and effective way to control perennial weeds. When targeting heavy populations of winter annuals or late flushing annual weeds that may reach seed-set, consider adding a tank-mix partner like BATTLEFRONT® or MPOWER® EXTRA HERBICIDE. When selecting a tank-mix partner, verify the product’s label for any re-cropping restrictions.
Spraying After A Frost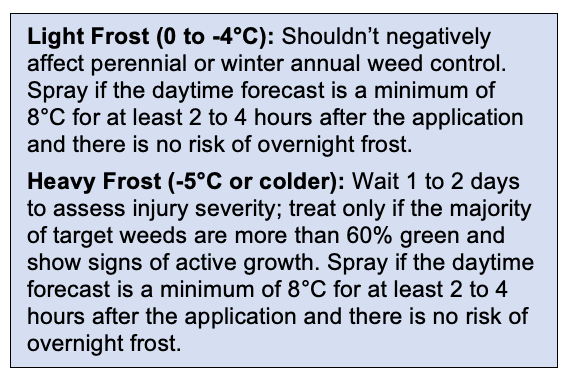
The impact of frost on weed control depends on the length and severity of the freezing temperatures, preceding weather, and the weed species. Generally, from most frost tolerant to least frost tolerant are dandelions, winter annuals, quackgrass, foxtail barley and Canada thistle. When possible, spray late in the morning or early afternoon when it’s warm and plants are most actively growing. Ideally, spray on sunny days. With cool temperatures, stop spraying 2 hours before sunset.
Should You Add A Tank Mix Partner To Your Post-Harvest Glyphosate?
Yes. Adding a tank mix partner such as BATTLEFRONT® or MPOWER® EXTRA will improve control of tough to kill weeds such as dandelion, flixweed, narrow-leaved hawk’s-beard, stinkweed, volunteer canola, and more.Plus it will get your cereal crops off to a cleaner start next year.
What About Spraying Perennial Weeds After Harvest?
Cooler temperatures in the fall trigger the movement of nutrient reserves down to the root or storage structures of perennial plants to build up reserves for growth in the following season. A fall herbicide application takes advantage of this increased nutrient flow to the roots, increasing the amount of active ingredient that reaches the plants growing points.
Recommended Rates and Staging for Post-Harvest Application of Glyphosate
The following are application and staging recommendations based on the weeds being targeted for a post-harvest application of Destroyer™ or Disruptor® 540 glyphosate:
| Target Weed | Regrowth Required | Rate (L/ac) | Tillage Interval | Comments |
| Canada Thistle | 3-4 new green leaves | 0.67- 1.33 | Min. 5 days | Use higher rates for larger plants. Ensure adequate regrowth and good environmental conditions. |
| Dandelion | <6 in. diameter
>6 in. diameter |
0.67- 1.0
0.67- 1.33 |
Min. 5 days | Use higher rates for larger plants. Apply pre-bloom to full flower for best results. Dandelions covered in straw will likely not be controlled. |
| Foxtail Barley | Look for new growth (tillers) | 0.67- 1.33 | Min. 3 days | Use higher rates for heavier infestations. Control measures may be needed next spring to control seedlings. |
| Quackgrass | 3-4 new leaves and 6-8 in tall | 0.67- 1.33 | Min. 3 days | Use higher rate on heavy or sod-bound infestations. Best to cut stubble high to ensure enough leaf surface for proper herbicide uptake. |
| Winter annuals | 60% leaf tissue green and actively growing | 0.33-1.0* | Min. 3 days | Fall applications can be more effective than spring applications. Winter annuals* include flixweed, narrow-leaved hawk’s-beard, night-flowering catchfly, prickly lettuce, round-leaved mallow, shepherd’s purse, stinkweed, storksbill and wild mustard. |
| Alfalfa | Min 8-12 in. height | 1.0- 1.33 | Min. 7 days | Optimum translocation of herbicide to growing points is essential for long term control. Early fall applications are better than spring applications. |
*Control of winter annuals will be improved with the addition of a pre-seed broadleaf herbicide such as BATTLEFRONT or MPOWER EXTRA HERBICIDE.
Summary
A post-harvest herbicide application is a great strategy for cost effective, long-term perennial and winter annual weed control. So, when the window for pre-harvest application has passed, and winter annual and perennial weeds are in your fields, consider a post-harvest application for a head start in the spring.
BATTLEFRONT®, DESTROYER™, DISRUPTOR® and MPOWER® are trademarks of AgraCity Crop & Nutrition Ltd. or its affiliates.
Mixing
Application Timing
Rates and Water Volume
Surfactants
_________________________
Mixing
Q: What is a general mixing order when tank mixing herbicides?
A: The general mixing order is represented by the acronym WALES. This stands for:
- Wettable powders (dry ingredients, such as SG, WDG, DF formulations)
- Agitate (to ensure dry ingredients are well mixed)
- Liquid and soluble products (such as SC, SL formulations)
- Emulsifiable concentrates (EC formulations)
- Surfactants (including fertilizers)
This works for the majority of situations. However, there are some new formulation types on the market, so many agronomists now use the acronym WAMLEGS to take this into account:
- Wettable Powders
- Agitate
- Microencapsulated suspensions
- Liquid and soluble products
- Emulsifiable concentrates
- High-load Glyphosates
- Surfactants
Within each formulation type, the order does not generally matter (i.e. if you have 2 EC formulations in the mix, either may go in first)
Q: Should I wait for more weeds to emerge, or just go now?
A: This is always a tough decision and depends on many factors. Product labels will list the maximum size or stage of weed that it will control. They will also list a maximum stage that is safe on the crop. If either the crop or weeds are approaching this maximum, it is best to spray now. In addition, every day those weeds are there they are competing with the crop and using water and nutrients which will affect yield. If you think there may be weeds coming, it may be wise to spray now but use a product that has some soil residual activity to control flushes of weeds that come later. If the weeds that are there now are still small and not competitive, it may make sense to delay the application.
If you decide to spray now and control the weeds you have, it is always an option to come back with another application later if they do emerge- often the weeds that come later will be smaller and thinner populations and you may be able to get away with a cheaper product for this second pass that will allow the cleanest fields without much additional input cost.
Application Timing
Q: Does the early application make sense?
A: Weeds are easiest to kill when they are small. If you have some tough to kill weeds on your farm, it may make sense to spray early for the best control. Many herbicides have residual activity and will control second flushes of weeds anyways, so it makes sense to apply early with these weeds and get the full extent of that residual. Some herbicides are also safer on the crop at earlier stages than later, so again early application makes sense with these products. For crops like lentils that are not very competitive when they are small, the early application may make more sense to prevent weed competition than in more competitive crops. However, if weed populations are small and light, and a big rain is forecast that will germinate more, it may make sense to hold off. Just remember that every day the weeds are out there they are competing with the crop and using nutrients and moisture. Spraying early, you can always make a second application later to control newly emerged weeds, but if you wait too long and the weeds get too large, you may not have herbicide options left that will control them.
Q: Should I wait for more weeds to emerge, or just go now?
A: This is always a tough decision and depends on many factors. Product labels will list the maximum size or stage of weed that it will control. They will also list a maximum stage that is safe on the crop. If either the crop or weeds are approaching this maximum, it is best to spray now. In addition, every day those weeds are there they are competing with the crop and using water and nutrients which will affect yield. If you think there may be weeds coming, it may be wise to spray now but use a product that has some soil residual activity to control flushes of weeds that come later. If the weeds that are there now are still small and not competitive, it may make sense to delay application.
If you decide to spray now and control the weeds you have, it is always an option to come back with another application later if they do emerge- often the weeds that come later will be smaller and thinner populations and you may be able to get away with a cheaper product for this second pass that will allow the cleanest fields without much additional input cost.
Q: Timing – what happens if I go too early or too late?
A: The crop and weed stages listed on the label give the range that is safe for the crop and effective on the weeds.
Spraying too early or too late may result in crop injury, as the crop is not metabolizing the chemical quick enough to avoid injury. This injury may be just a bit of yellowing or may result in warped or empty heads which will greatly affect yield. Spraying too early on the weeds may not result in enough chemical absorbed to kill them, or too late they may be too large and grow through the application so control will be reduced or not effective at all. It is always best to stay within the timing guidelines on the label.
Rates and Water Volume
Q: Water volume – can I cut my water volume?
A: Product labels will list the minimum water volumes needed to control weeds, and these should be followed. Systemic herbicides are taken in and translocated throughout the weed so good coverage may not be as important with these and often a 5 gallon/ac water volume is sufficient. Contact herbicides are different- they are not translocated throughout the plant so coverage is extremely important to kill the weeds. With these, a 10 gallon/ac water volume is often a minimum. Higher water volumes will also help if the canopy is dense or the weeds are large. Reducing water volumes risks poor weed control, and may increase the risk of crop injury if you have a lot of products in the tank at once as the droplets become concentrated.
Q: Rates – can I cut rates? Will it work better if I raise the rate beyond label rates?
A: When new products are registered, they have to show PMRA that the rate they are being used at is the lowest effective rate to control the pest. Spraying at lower rates than this risks the product not working, especially if conditions are not perfect. It may also increase the risk of developing resistance on your farm.
Spraying higher than normal rates risks injury to the crop, unacceptable residues, or carryover concerns. It is best to follow label directions and apply at the rates listed there.
Q: Does using lower than recommended label rates increase the risk of herbicide resistance?
A: Yes, it does. In particular, a type of resistance called “metabolic resistance” occurs when weeds still absorb the product but are able to metabolize it to a non-toxic form before it is able to kill the plant. Applying rates lower than those on the label increases the risk of metabolic resistance occurring as it increases the chances of these resistant plants surviving and passing their genes to their offspring. The PMRA requires that new herbicides show that the labeled rate is the lowest effective rate to control the labeled pests, so lower rates will not be effective on these weeds.
Surfactants
Q: Do I have to use a surfactant?
A: Yes. Surfactants are recommended for many products because they help maintain or improve performance in a wide variation of weather conditions and crop stage. If the product label recommends adding surfactant, failure to do so can results in decreased performance or crop yellowing.
Can I swap out the recommended surfactant for something I already have in the shop?
The label for some products (or provincial Crop Protection guides) specify which adjuvants may be substituted as there are often different trade names for similar adjuvants. For example, the flucarbazone page in the Saskatchewan 2020 Guide to Crop Protection states to add Agral 90®, Ag-Surf® II, Liberate®, ProSurf™, Super Spreader, or LI 700® as these are all trade names for non-ionic surfactants. However, switching into adjuvants of different types will have risks of either reduced weed control or increased crop injury. Each product is researched to find the optimal adjuvant system for its performance so these are the adjuvant classes that should be used.
Q: Should I use a surfactant even if the directions say I don’t need to?
A: No- adding surfactants that are not listed in the directions is risky. The biggest risk is injury to the crop as the surfactants may heat up the mixture. It may also lead to loss of weed efficacy as too much surfactant can cause the spray droplets to run off the leaves without being absorbed into the plant.
When new active ingredients are registered, they are tested to determine the optimum surfactant for performance, so adding additional surfactants risks decreasing the satisfaction with these products.
Q: How much impact does water quality have on herbicide performance?
A: Water quality may severely impact herbicide performance, depending on the active ingredient. For example, when glyphosate is added to spray water, it breaks down to its salt form. Ions in the water such as bicarbonate can bind to these molecules which prevents them from being taken up into the weeds and control will be reduced. At very high or low pH, some herbicides will precipitate out of the solution and will not be taken up into the weeds (and risk plugging the sprayer).
Q: Can I mix foliar with my herbicides?
A: Foliar micronutrients often work best when applied early in the season, so herbicide timing may be a great time to apply them (depending on the product). As these products often contain metals such as copper or zinc, they may bind to herbicide products and reduce efficacy of the herbicide if they are not compatible. This is very product-specific, so most foliar suppliers will have a compatibility chart showing which products their research has shown to be compatible with.
As foliars are not listed on approved herbicide labels, this is often done at the grower’s own risk. Water quality can have a very large impact on compatibility as well, as water hardness, metals, pH, and other factors can influence the compatibility and it is impossible to test every variable out there. As a result, we often recommend a quick jar test to confirm compatibility with your personal water source before mixing up the first spray tank: In a glass jar, mix the herbicides and foliars at the same ratios and water volumes you plan to spray with, and in the same order you will mix them. Between the addition of each product, shake the jar to simulate agitation. Once mixed, allow to sit for at least 30 minutes. After this time, check for any gelling, separated layers, or strange chunks that have come out of solution. If the mix looks good, you can likely proceed with the application. A jar test is an extra step but is a lot faster than cleaning out a sprayer tank if you have compatibility issues!
Q: Do you need to do a pre-seed herbicide application?
A: If you did a late fall post-harvest herbicide application your fields may already be clean for spring. Consider a pre-seed application this year if you see weeds emerging or you noticed late season weed growth last fall.
Q: What crops are you growing this year?
A: For convenience and time management, It can be tempting to go with one pre-seed herbicide for the entire farm, but that may not be the best choice for each crop. There are few pre-seed herbicide products that can be applied on every crop, so before you finalize your purchase decisions match the right product with the right crop. For example, you may use a different product or mix of products in your cereal crops as compared to your canola or pulse crops. Cereal crops are also more competitive than pulse or canola crops, and some options for cereal crops have residual control so a cereals only product makes sense. The number of choices can be overwhelming, so contact your local AgraCity representative and discuss which options might be best for every acre on your farm.
Q: What weed problems did you see in your fields last year?
A: Did you notice winter annuals such as dandelion, stinkweed, narrow-leaved hawk’s beard, flixweed or other hard to control weeds? Did you observe volunteer canola, volunteer cereals, kochia, cleavers or other problem weeds? If so, take time to determine what products will give you the best control for these tough weeds, as glyphosate alone may not be enough.
Q: Why you should Start with Glyphosate? Use it and know your rates!
A: Start With Glyphosate and know your rates. Glyphosate is an outstanding tool for pre-seed application, but it makes sense to adjust your application rate depending on the weed spectrum. If there are perennial weeds like dandelion or quackgrass then increasing the rate of glyphosate to around 1 litre REL equivalent per acre is a good recommendation. Otherwise ½ L/acre of Disruptor® 360 glyphosate, or 0.33 L/acre of Disruptor 540 glyphosate should be sufficient for good control.
Q: Why you should check Water quality?
A: Glyphosate is sensitive to water quality; hard water or water containing calcium (Ca+), magnesium (Mg+), or iron (Fe+), or dirty water or water with suspended soil or organic matter will reduce control. If there have been water quality issues in the past, if you are not sure about your quality, or if you know that you have hard water, consider adding a water conditioner, such as Citrisoft from AgraCity. The slight additional cost may be worth to improve your glyphosate performance.
Q: Why add a Tank mix partner to your Glyphosate?
A: A glyphosate is a critical tool for pre-seed control but it has some gaps in performance and weeds resistant to glyphosate are becoming a problem. Adding a tank mix partner can help with tough to kill weeds like kochia, narrow-leaved hawk’s-beard, volunteer canola, flixweed and more. For example if you have group 2 and 9 resistant kochia, you should consider a tank mix partner such as Revenge™ (carfentrazone), Revenge B (same actives as Nufarm’s Conquer®), Revenge M (carfentrazone + MCPA Ester), or Revenge Pro (carfentrazone + 2,4-D Ester). All these products add 1-2 additional modes of action to your glyphosate which will result in improved weed control plus improved herbicide resistance management.
If you farm in the northern parts of western Canada and have group 1 resistant wild oats you should consider adding Himalaya™ Express, Himalaya Pass, Himalaya Pro, or Himalaya Trio for an additional pre-seed mode of action on wild oats, plus excellent broadleaf control as well. Just ask your AgraCity representative about these new options.
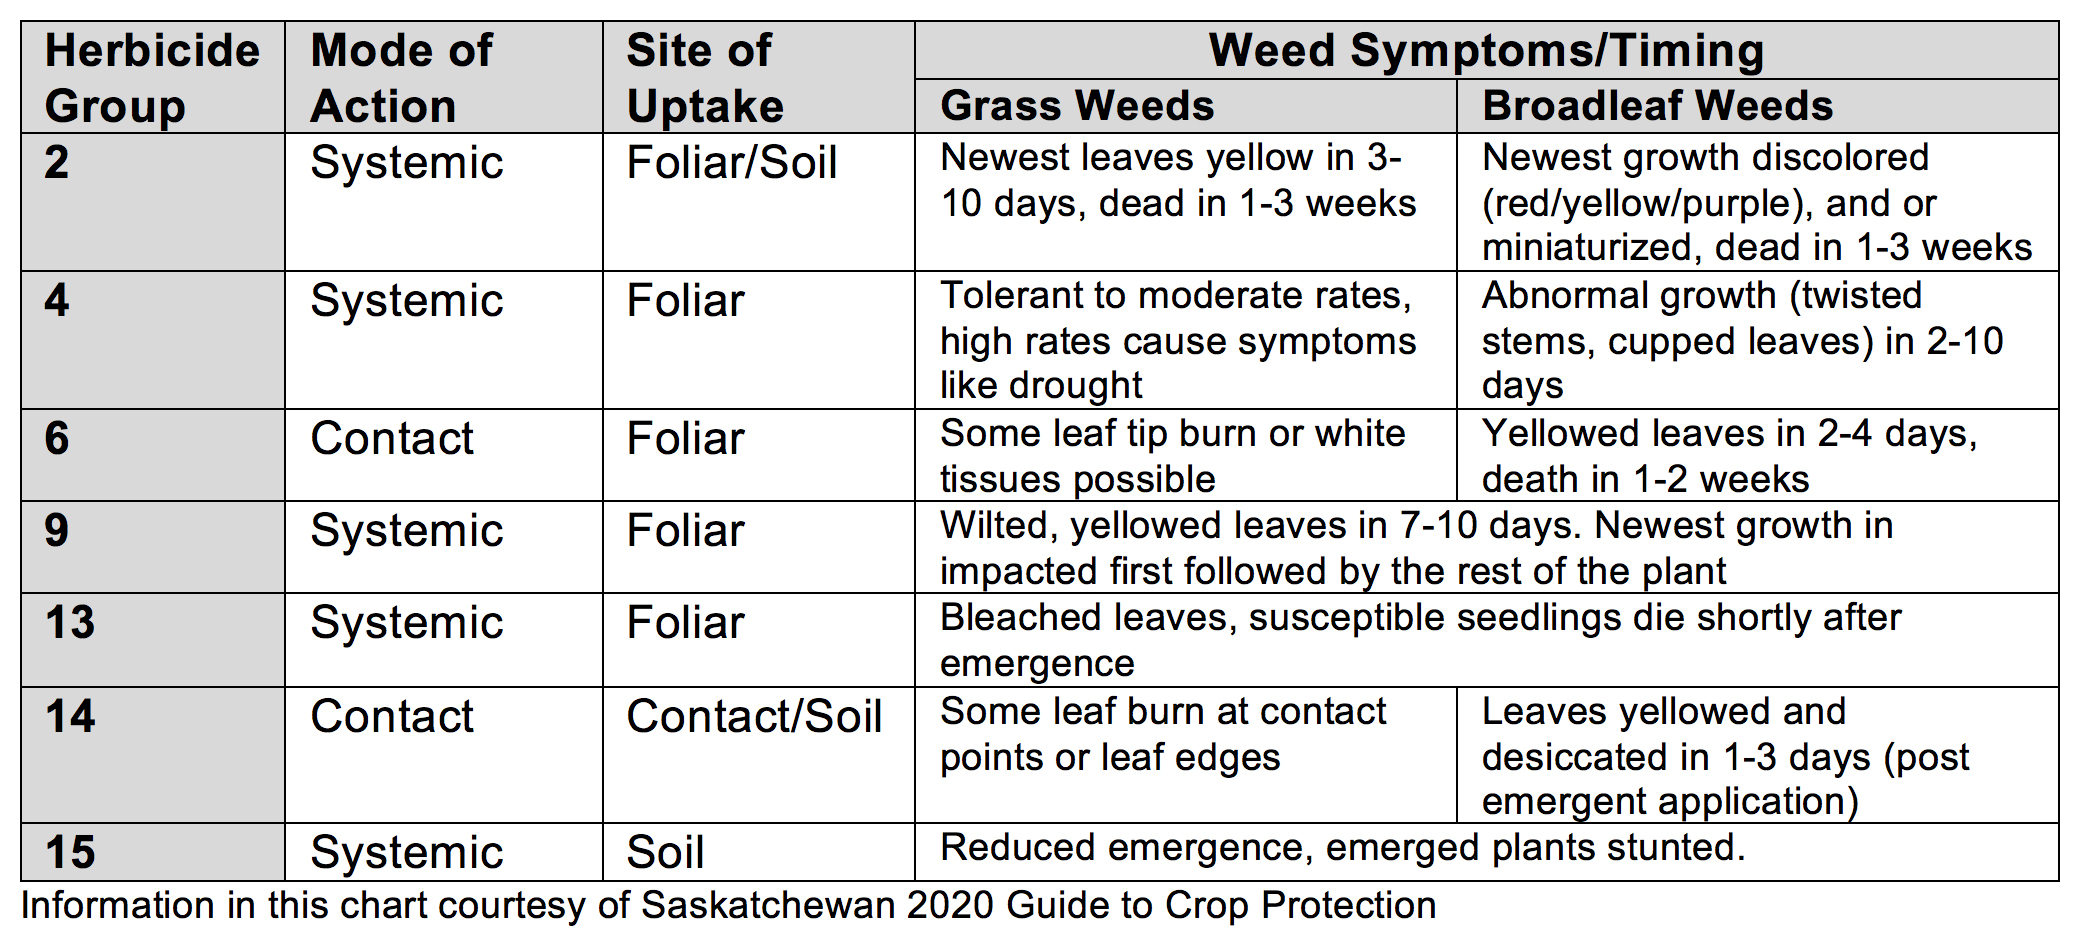
Q: Contact or Systemic Herbicides- Which is better?
A: For some crops, you can choose either contact or systemic herbicide options. Both have strengths and weaknesses. Contact herbicides usually act quickly, but only control the part of the plant on which they were sprayed, so lots of water and warm sunny temperatures are important. Contact herbicides usually have little residual activity, so they are well suited for sensitive crops such as pulses or canola. Systemic herbicides are absorbed by the plant and taken into the root system for complete control, but rely on good growing conditions for best control, so cool conditions are not ideal. Depending on the product they can have residual activity, so they are often best suited for cereal crops. Contact and systemic herbicide combinations can sometimes be better than either product alone. For comparison, the chart below lists common pre-seed herbicide groups. The most common herbicide groups for pre-seed are 2, 4, 6, 9, 13,14 and 15. It can be confusing – if you are not sure how to choose a product, contact your AgraCity representative and they can help you choose the best products this year.
The Mode of Action, Site of Uptake and Symptoms of Different Herbicide Groups
Q: Why you should maintain Recommended water volume??
A: It is important to maintain your water volumes for pre-seed applications, as many weeds are likely small, plus growth may be slower due to cool temperatures. This is especially important if you are applying a contact herbicide where coverage is critical to maintaining performance.
Q: Why always follow Label’s recommended application rates?
A: As with water volume, application rates are important to maintain performance. Do not cut back rates as performance can be reduced.
Q: When is it too cold to apply?
A: Pre-seed application can be challenging due to variable weather conditions. Below are some temperature requirements and guidelines for pre-seed application:
- If the daytime temperature is forecasted to reach a minimum 8-10°C, plan to spray once the temperature reaches a minimum 5°C. It is best to spray in the morning or early afternoon as temperatures rise throughout the day. Avoid application into the evening if the temperature is to drop below 10°C. In this case, stop spraying 1.5 to 2 hours before sunset or before it drops below 10°C. This allows time for the product to move from the leaves to the growing points of the plants
- Plants must be actively growing, with new green leaves and new growth emerging from the center of the plant.
- Overnight lows around 0⁰ to – 2⁰ Celsius: begin spraying once the temperature is +5⁰ Celsius and rising.
- Overnight low ranging from – 2⁰ to – 5⁰ Celsius: begin spraying once the temperature has been + 5⁰ Celsius for a minimum of 2 hours and rising, assuming there is active plant growth.
- Overnight low of – 5⁰ Celsius or colder: wait for at least several days of overnight lows that are 0⁰ Celsius or warmer + active plant growth.
- When temperatures start to decline at the end of the day: it is advised to stop spraying, when overnight lows will be around 0⁰
- If overnight lows ranging from 0 to – 5⁰ Celsius, stop spraying 2 to 4 hours before temperatures start to decline at the end of the day.
Spray and seed later that day or next day as long dandelions or quack grass are not the targeted weeds. If dandelions or quack grass are present wait 48 hours after application to seed.
Q: Apply early or wait?
A: If you have been dealing with a particularly problematic field, or problem weeds such as kochia, Russian thistle, narrow-leaved hawk’s-beard, or other hard to kill weeds, consider delaying your pre-seed herbicide application to allow these weeds to germinate, be in a better stage for application, or for the weather to improve, which will increase the probability of getting better control prior to seeding. Some products also have after seeding application options but be careful – once the crop is emerged it can be controlled by your pre-seed herbicide, so check the label thoroughly before considering a post-seeding application.
Q: Apply Fungicide or Not?
A: It’s Not An Easy Decision.
Below are some factors to consider, keeping in mind that most fungicides are preventative in nature, which means by the time you see disease it is too late to apply.
- Is there a host crop? Are you growing a crop that is susceptible to diseases, such as pulses, cereals, or canola?
- Are conditions favorable for disease presence?
- What is the history of disease for that area and crop?
- How likely is it that the disease will be present and is treatable?
- What is the value of the crop?
- What is the potential for crop loss if you do nothing? (yield and quality)
- What is the cost of the product and application?
- Can the product be applied at the correct timing?
Q: What Are The Economics Of Fungicide Application? Cost vs. Benefit.
A: Think about the factors below to determine if a fungicide application is likely to be a good return on investment.
- Crop type – some crops are more susceptible to diseases than others.
- Crop value – the higher the value of the crop the more sense it may make to apply fungicide.
- Yield potential – higher yield potential can provide a bigger payback on your fungicide investment.
- Level of infection – very high levels of infection increases the need for disease control.
- Cost of treatment – purchasing an affordable product that does only what you need can save you money and increase your returns.
- Potential payback – this will be variable from year to year
Q: Which Fungicide to Purchase?
A: Make A Smart Fungicide Purchase Decision.
- Once you have decided that fungicide application makes sense this year, figure out which fungicide option makes sense for your farm – the high priced brand names will cost more and may be more than what your crop actually needs.
- What diseases are most common in your area in the past?
- What diseases are forecast to be a concern this year?
- Does the product I am considering control the diseases I expect on my farm?
- What is the cost per acre at the required rate?
- Does the product I am considering have a proven track record for disease control?
With input costs on the rise, unpredictable markets and variable weather, what can you do to manage your input costs for pulses in 2020? Below are some ideas that could help.
Tip #1: Make Sure Your Equipment Is Field Ready.
- Tune-up and repair all your field equipment prior to spring work.
- Poorly maintained equipment can increase fuel consumption and operating costs, plus increase the chances of breakdowns in season.
Tip #2: Review Your Fertility Requirements.
- Start with a soil test. Fertilizer is one of the biggest expenditures on your farm, so soil testing makes a lot of sense. Following updated soil test recommendations can help pinpoint precisely what each field needs.
- Do you need the same inputs on every field every year? Are some fields higher in available nutrients due to dry conditions or crop rotations? Check field-specific soil tests to make sure.
- Is variable rate application right for your farm? Varying the rate of fertilizer (or other inputs) across a field could help reduce your total fertilizer costs without losing yield.
- Shop Around For Savings. AgraCity also has a complete line-up of pulse inoculants and fertility products listed below to help you save money, including:
- Boost NCT pea/lentil liquid
- Boost NCT pea/lentil pea
- Boost NCT pea/lentil granular
- MicroPhos All-In-One: Phosphorus + micro-nutrients in 1 easy to use prill.
- MicroPhos Zinc: Phosphorus + micronutrients + Zinc in 1 easy to use April.
Tips #3: Calibrate Seeding Rates And Equipment.
- Check seeding rates. A lower than recommended seeding rate will reduce your plant stand, decrease competition with weeds and even reduce yield. A higher than recommended seeding rate will increase your cost/acre.
- Always check the seed size and calibrate your seeding equipment accordingly before you start seeding. And don’t forget to calibrate your inoculant amounts too.
Tip #4: Evaluate Your Herbicide Needs.
- Start by reviewing last year. What weed problems were noticeable at harvest? This can help you determine what weeds are likely to be a problem this year.
- What is the right product for each field? Different fields can have different weed issues, make sure you scout fields thoroughly prior to application to determine the best product for each field.
- Pre-seed: plan on a pre-seed application to manage hard to kill weeds, as there are no good in-crop options for weeds such as kochia. With herbicide resistant weeds an increasing problem, a tank mix with your glyphosate is a must. Or consider a pre-emergent application of Edge® from Gowan prior to seeding as well as a pre-seed application of glyphosate + an add-in tank mix.
- In-crop: Consider your weed spectrum before deciding on which products to use. Pulse crops have fewer post-emergent options compared to other crops, so it makes sense to look carefully at which products offer the control that your fields need.
- Do you need to spray the whole field? Shutting off the sprayer in weed free areas of the field could reduce your herbicide costs without compromising weed control.
Consider next generation digital AI agronomy services from AgraCity that utilizes ultra-high -resolution imagery to quickly and accurately identify weeds, insects, diseases and more. Call 1-844-269-3276 to set up an appointment with a digital agronomy expert.
- Could faster sprayer fills save time and money? Consider a bigger pump or water hauling system. Filling the sprayer takes a lot of time, faster filling can free up more hours for application, especially if weather conditions are less than ideal during application season.
- Save up to 30% by buying your pulse crop herbicides listed below from AgraCity. They have the same actives as the brand names and are delivered direct to farm. Make sure to check the label for crops, rates, water volumes and other important information.
- Disruptor® 360 or 540 glyphosate
- Revenge® pre-seed prior to pulse crops: same active as Aim® from FMC
- Revenge M pre-seed for peas and flax: same active as Aim + MCPA
- Anaconda™: superior performance grass and broadleaf control in peas. Same actives as Viper® from BASF and Assure™ II from Corteva
- Boa® in many different pulse crops: same active as Basagran® from BASF
- Boa Pro in peas: same actives as Viper® from BASF for peas
- Samurai® in peas: same active as Solo® from BASF for peas
- Samurai Master: outstanding broadleaf and grass weed control in peas. Same actives as Solo and Independence®
- Ninja®: same active as Odyssey® from BASF for peas
- Ninja Master: top notch grass and broadleaf control in peas; same actives as Odyssey + Independence
- Kamikaze®: same active at Pursuit® from BASF
- Independence®: same active as Centurion® from Bayer
- Quiz®: Same active as Assure II from Corteva
Tip #5: Manage Fungicide Costs.
Diseases can severely impact pulse crop yield and quality if inoculum is present and environmental conditions are conducive to disease development.
- Start with a seed treatment for early season protection of seed and soil borne diseases.
- For in season disease management, before you spray ask yourself three key questions:
- Am I in area that has had disease concerns in the past?
- Are the crops I am growing susceptible to diseases?
- Are the environmental conditions suitable for disease this year?
- If you answered yes to all three questions, then fungicide application will likely be required this year.
- Do you need to spray the whole field? Or just heavily canopied areas? Next generation ultra-high-resolution digital agronomy from AgraCity can help determine which areas of the field need fungicide, and which areas may not.
- How many fungicide applications do you need? Closely observe crop growth and growing conditions carefully throughout the season to assess how many applications are required, and if you are doing multiple applications remember to rotate fungicide groups to prevent resistance.
- Shop around for the best price. AgraCity can help through a growing portfolio of fungicides with the same actives as the brand name products.
- Spade®: Same active as Headline® from BASF
- Spade Plus: Plant health in a box: same active as Headline® + foliar micronutrients.
Tip #6: Reconsider Your Insect Pest Control.
Pulse crops have relatively few insect pests of economic importance, but the few that can affect pulses must be monitored to prevent yield loss.
- Start by thinking back to last year – what insect pests were present in your area?
- Consider a seed treatment that contains insecticide to provide protection from early season in-sect pests.
- Check provincial insect outbreak forecasts for anticipated insect problems in your area.
- For in-season insect outbreaks, be prepared to scout every few days to determine if application is required. This is especially important for early season pests like cutworms.
- Understand the economic threshold for each insect pest before deciding whether to apply, as the pest threshold may be too low to justify insecticide application.
- Avoid revenge spraying; a few insects may be frustrating, but potential losses may not be enough to justify the expense of spraying.
- Resources like provincial pulse grower websites or provincial crop protection guides can provide additional information and recommendations on controlling insect outbreaks in pulse crops.
Tip #7: Cut Your Desiccation Costs.
- Before you apply desiccant this year, consider the entire field; are some spots already mature and do not need desiccation? Digital agronomy scouting prior to the application could save you time and money by reduced chemical and application costs.
- Consider your application timing. Application in the evening and into the night, using high water volumes and the higher end of the recommended rate scale will result in quicker and more consistent dry-down, which will improve your crop quality, allow quicker harvest, and can improve your returns.
- Clone® is registered for use as a desiccant in some pulse crops; check the product labels for a complete list of registered crops and uses.
Always refer to the product label for complete instructions.
Boa®, Clone®, Disruptor®, Independence®, Kamikaze®, MPower®, Ninja®, Quiz®, Samurai®, and Spade® are registered trademarks of AgraCity and its’ affiliated companies. Anaconda and Revenge have been applied for as AgraCity trademarks and are pending approval. All other product and company names are trademarks™ or registered® trademarks of their respective holders. Use of them does not imply any affiliation with or endorsement by them.
Tips for Effective Sprayer Tank Cleanout
Herbicide application in western Canada is complex with many different factors that need to be considered. And with more diverse crop rotations, it is more important than ever to do a good job of sprayer tank cleanout.
Most herbicides used in western Canada have many great attributes, including good performance, concentrated formulations, tank mix options, and are easy and convenient to apply. With higher concentration comes higher risk of contamination on subsequent crops if spraying equipment, including tanks, filters, booms and nozzles, are not properly cleaned out.
Therefore, proper sprayer cleaning is a critical component of sprayer maintenance as it will reduce contamination risks and potential crop injury from equipment contamination.
Herbicide residue can stick to tank walls and crevices and may be brought into solution by a subsequent herbicide or a particularly effective spray adjuvant acting as a solvent. Plastic or polyethylene tanks and hoses tend to require more extensive cleaning than stainless steel tanks. Post-emergent application sprayed directly on crop foliage will have a greater potential for crop injury than soil-applied herbicides. Crop injury from sprayer contamination can occur even several months after using the sprayer without proper cleanup, and injury can occur even following several subsequent applications.
All herbicides have some risk of contamination if proper tank cleanout is not done. Many group 2 herbicides are considered higher risk due to high concentration of active ingredient in most formulations combined with very high activity on common western Canadian crops, especially canola.
Q: What can growers do to ensure a successful tank cleanout?
A:
- Understand your risk. Different crops have different sensitivities depending on the herbicide used. If you are changing crops, the risk will be elevated. Concentrated group 2 products can cause injury even at very low use rates, so consider these factors and be prepared to spend extra time on tank cleanout if either of these apply to your situation. Keep good records for backup.
- Know your sprayer. With many different manufacturers and models available, it pays to know where the problem areas might be, such as boom ends, elbows, valves, hoses, screens, and nozzle bodies. Ball valves or cam lever end caps are cheap insurance to make cleanout easier and keeping the operator’s manual with the sprayer is a good idea as well.
- Empty the tank. Completely empty the spray tank thoroughly after use by spraying out the entire tank prior to clean out. Mix only the amount that is required – if a field is 200 acres, only add enough product to apply for 200 acres. Avoid leaving spray mixture in the tank overnight as some products become inactivated or the risk of contamination increases. Doing this will save money as well as cleanout time and will reduce risk of contamination of subsequent crops.
- Do not wait to clean your sprayer. Clean out the spray tank as soon as possible after use. Dried pesticide residues are much more difficult to clean out than products in solution. Do this by thoroughly rinsing the spray tank with water, circulate the water through the sprayer system, and if possible, apply the rinsate to the treated field. Do not clean the sprayer near creeks, dugouts, sloughs, wells, or any other water source, and ensure that the wash water does not met any desirable vegetation or its roots. This includes crops but also trees, lawns and gardens commonly found in or near a farmyard.
- Rinse #1: Spray down the inside of the spray tank with water and add water to the tank to fill to minimum of 10% of the tank volume, then agitate for 15 minutes. After agitation, flush out the sprayer through the filters, booms and nozzles, and open the ends of each boom and flush out the entire tank contents through the open booms.
- Rinse #2: Fill the tank with water and add a tank cleaner such as All Clear® or 1% Ammonia at 1% v/v. Agitate for 5 minutes and flush the booms and nozzles again, then remove the nozzles and screens and clean thoroughly with detergent or tank cleaner before replacing. Pay particular attention to end boom caps as pesticides can settle in this area and become difficult to clean out. This is a critical step in the cleanout process, as some group 2 products can become trapped on tank walls when mixed with EC products and a tank cleaner is a must to properly clean the tank.
- Rinse #3: Do a final rinse with water by filling the spray tank 1/10 full and agitate, then thoroughly flush out booms and re-install nozzles, screens and endcaps before resuming application.
If in doubt, always refer to the product label for full details, or contact AgraCity to discuss best practices for tank cleanout.
For further information on sprayers and application in general, go to www.sprayers101.com for great information about sprayers and application.
*Information for this article taken from the Alberta Crop Protection Guide 2019 and “Sprayer Tank Clean Out: Issues In the Field” presentation made by Keith Gabert of the Canola Council of Canada, Agronomy Update, Alberta, January 2016.
Our action to reduce the spread of Covid-19
The ongoing COVID-19 pandemic is a serious public health issue. AgraCity takes the health of farm families seriously, while at the same time continuing to provide cost-effective products and solutions for farmers across Canada.
To support the efforts underway to slow the spread and impact of the COVID-19 virus and to protect you and your family, AgraCity is taking the following steps:
Logistics
Our warehouse and logistics team are at full capacity working staggered shifts to limit the exposure to COVID-19.
Product Delivery
All product deliveries for spring are continuing. Delivery staff will be practicing safe hygienic procedures, including hand sanitizing, maintaining social distance, wearing protective masks, and disinfecting computers used during the transportation and delivery process.
The AgraCity Team
All members of the AgraCity team are conducting business as usual and are working to help you save money on crop inputs this year. Office staff in essential IT and accounting functions are on site and working at full capacity.
Competitive Pricing
COVID-19 has disrupted financial markets, exchange rates and increased costs but AgraCity is working hard to maintain competitive pricing to you.
Everyone at AgraCity will continue to work with you to help manage your farm business and save money on crop inputs through this challenging time.
We appreciate your business and look forward to serving you throughout 2020 and beyond.
Jason Mann
President
AgraCity Crop & Nutrition LTD.